
Have you ever gone to print something and the printer either won’t print or prints streaks or has missing print? Ink can dry and cause the print head to no longer be able to move ink through it. Some kinds of ink, such as sublimation or DTF, are more prone to clogging than others. If any inkjet printer sits for too long without printing through all the print heads, problems can arise. Sending a print job at least once a week that will use all the heads can help to prevent problems. You can do this manually or you can schedule it to happen but not all printers allow for scheduling via their software and not all printers can be accessed via the internet. You can create your own internal setup that will send a scheduled print job to each printer on your network or physically connected to your device.
If jobs have faint print, lines in the print, or missing print some common causes can be low ink or a print head that isn’t working properly. Most printers will have utilities typically accessed from the machine’s screen or the software for that printer. These utilities may come in two flavors, a routine nozzle cleaning utility and a more intense version. Jennifer Maker has a great video and article on her website detailing how to clean print heads on an Epson printer using sublimation ink. You can find it here. In addition to detailing everything you can do she also has files you can download for free to assist you.
Some of the downsides to using the utilities she talks about are, wasting ink and potentially damaging your printer. You may notice that only one of the colors is a problem but when you run a print test it must run all the colors. This wastes a lot of ink. Remember, it’s not just the little bit you see on the paper, it’s the ink that is getting flushed into a maintenance box, at least on Epsons. Power cleaning uses a LOT more ink. On top of the ink that gets used, once the maintenance box is full you might not be able to print until you deal with that.
Sometimes you can fix issues by just replacing the ink cartridge which also holds the print heard. However, in these echo tank printers that won’t work. I had a brother printer that sat unused for more than a year. Even after replacing the ink cartridges it never worked right. After going to extreme lengths I did get it to print again. Until it sat for maybe a month or two and stopped working again.
Jennifer suggests printing a document that uses all the colors once a week, so that things keep moving through the lines and heads. If you do a lot of color printing every week you might not need to do any of this because you will be pushing ink through the lines and heads. If you’re only printing black through your color printer you will probably still want to go ahead and schedule a job or set a reminder for yourself to print your maintenance job.
Since we have more than one printer and we don’t do a ton of printing I decided the best solution was to automate this rather than setting a reminder and doing it manually.
NOTE: This is the first time I have worked with specialty inks like sublimation or dye for silk screen films. I have not worked with DTF inks. From what I’ve read it seems that they like to clog, especially the white. I haven’t tested this on a DTF or DTF converted printer I would assume that sending a print job at least once a week to a printer that isn’t used on a regular basis would not hurt anything but you need to know I haven’t personally done this.
GETTING STARTED
The first thing is to create a file that has something which will access all the colors of your printer. If you don’t want to create something you can download the one that Jennifer Maker has on her website. If you have a printer that isn’t color you can still send the same file, it will just do shades of black/grey.
The easiest way to find Scheduler in windows it to type in “Task Scheduler” in the search box on the task bar. 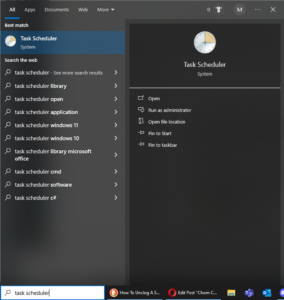 Open the “Task Scheduler – System” option from the menu. You should be presented with a screen that looks like this.
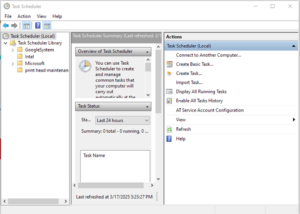
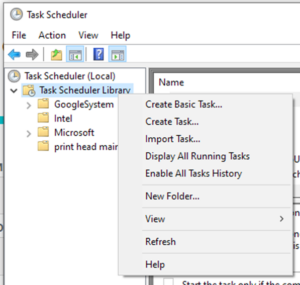
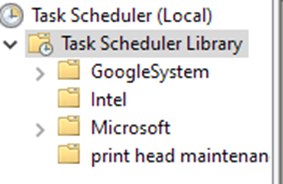
Click on Task Scheduler Library, then right click. You will be presented with a pop, click on “New Folder”. Type in a name. I suggest you use something to describe what this will do to help you remember what to look for in the future.
I called mine “print head maintenance”.
Now click on your new folder, then click “action” and select “create a task”. 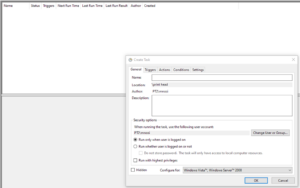
What you see will be different, your pc name and user login name will be different.
Give your task a Name, I would advise adding a Description that is meaningful. I would also suggest that you change the task to run whether the user is logged on or not.
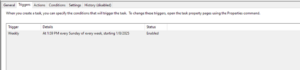
Click on the Triggers tab. This is where you will setup when the task will run. I set mine to run once a week on Sundays.
Click on the Actions tab. This is where you will tell the task what to run. I created a file called testprint2.cmd. It is located on the C drive\users directory\the user login name\documents directory\printheadcleaningfile directory. Where the file is located isn’t important. I kept mine on my C drive and I created a directory with a name similar to the actual task’s name.

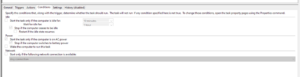
Under the Conditions tab, I checked the boxes for, Stop if the computer ceases to be idle, Start the task only if the computer is on AC power & Stop if the computer switches to battery power.
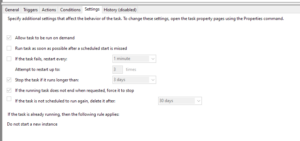
Under the Settings tab, I checked the boxes for, Allow task to be run on demand, Stop the task if it runs longer than 3 days (this is a variable you can pick for yourself), If the running task does not end when requested, force it to stop.
What does the .CMD file do?
What is in the testprint2.cmd file? The file name isn’t important, you can probably tell from this name that I was testing, failing, testing again before figuring out exactly how things had to be. I can rename this and then change it in the schedule utility to the new name. I just haven’t cared enough to do that yet. What IS IMPORTANT is the file name extension, .cmd this type of file can be run, it has commands in it.
wmic printer get name,default
“%ProgramFiles%\Microsoft Office\root\Office16\WINWORD.EXE” /mFilePrintDefault “c:\users\mnosi\documents\print head cleaning file\print head cleaning doc.docm”
wmic printer where name=”Brother MFC-L2707DW Printer” call setdefaultprinter
wmic printer get name,default
“%ProgramFiles%\Microsoft Office\root\Office16\WINWORD.EXE” /mFilePrintDefault “c:\users\mnosi\documents\print head cleaning file\print head cleaning doc.docm”
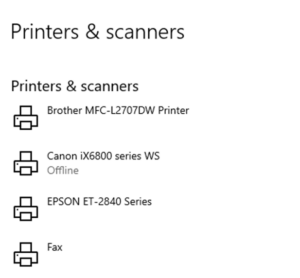
The first line “wmic printer where name=”Brother MFC-L2797DW Printer” call setdefaultprinter. This changes the default printer on your device to be the printer named and you can find the printer’s name by going to your printers on your device. If you have never done this, you can type “printers in the search box on the task bar. Then select printers & scanners from the list. If you want to know more about a printer listed just click on it, select Manage, then printer properties.
The second line, “wmic printer get name, default – calls that variable from the first line so it can use that printer. In this instance “variable” just means that “Brother MFC-L27087DW Printer” we assigned.
The third line, “%ProgramFiles%\Microsoft Office\root\Office16\WINWORD.EXE” /mFilePrintDefault “c:\users\mnosi\documents\print head cleaning file\print head cleaning doc.docm” = This tells it where to find the document we created that we want to send to the printer and tells the system how to open that document and where that program is located. In this case I created the file in MS Word installed on my pc. So, I had to find the WINWORD.EXE.
PRINT HEAD CLEANING DOCUMENT
What is in the print head cleaning document? “c:\users\mnosi\documents\print head cleaning file\print head cleaning doc.docm”
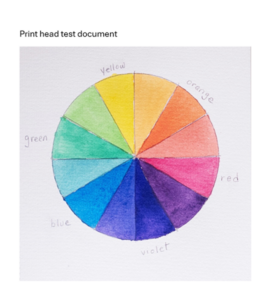
Just a simple color wheel is all that is in the document. What makes this document unique is that we use a macro to send the print job and then close the document and word.
MAKING THE MACRO IN WORD
What makes this word document unique is that you need to create a macro. This macro will then use the default printer, which you are setting up in the cmd file. It will print the document with the default printer and then close word.
How do you set up a macro? Click on “View” from the top menu bar in word. Select Macros, select “record”. This is what the macro should look like:
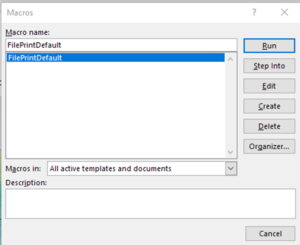

The “FilePrintDefault” in the macro is calling the variable that we assigned the name of our printer in the .cmd file. Our command file sets each printer on our network as the default printer. It then opens winword.exe. Word then runs the macro. The macro changes the default printer to the variable name, sends a print job, and then quits the application closing word. If there are multiple printers it does this exactly same action for each printer.
TESTING YOUR .CMD FILE
To test your “cmd” file you can open explorer and double click on the file. You will then see DOS prompt windows pop up. You can watch the system execute each command and verify that there were no errors and that test pages did print on each printer.
TIPS AND TROUBLESHOOTING
One thing that just makes life easier is to make the printer you want to be the default for your device the last printer called in the .cmd file. Word will remember and retain that as your default. If you have specialty printers with special ink, you don’t want your pc to use that as the generic default.
While writing this I added the EPSON and the Cannon to my .cmd file. I then ran the .cmd file and had an error printing on the EPSON printer. To determine if it was my automated file causing the problem or just the printer, I cancelled the test print jobs and sent a test print from the EPSON driver itself. That also failed. Now I know I need to go to that location and figure out why the printer can’t print. Don’t always assume that you made a mistake before testing to make sure it’s not a physical issue like being out of paper. KISS, Keep It Simple ah Silly.
All of this was written for windows using word as your document writing software. I am sure that you can do all these things in other OS’s or with other document writing software’s. I just have not tested on anything else. If I do have a need to do this with any other software I’ll document that as well.
Remember your setup is different and you may get different results. I can’t guarantee that this will work for you or that you won’t run into something I didn’t. This has been working for me in our environment with our printers but you need to do what you believe is best for you and your setup/needs.