
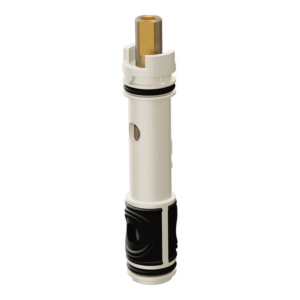
Moen one handle 1225 replacement cartridge
This is how it started. This small fairly inexpensive little part. It seemed so innocent, so well intentioned, so needed, right before it all went horribly, horribly wrong in a spectacular manner.
For most of our lives in this house we have had someone living in the basement, which actually sounds kind of creepy but it isn’t. When Sam joined the Marines the basement now had no occupant. Before he comes back for his leave we thought it would be a good idea to get in there and tackle anything that needed doing. This is when I discovered that the shower leaks. The leak was dramatic enough to splash when it landed causing the floor outside the shower to constantly be wet. Not a problem, I had worked for Delta Faucet support we can do this. Sam was shower certified, I had not done that training prior to leaving the company but I had listened to Sam often enough and read the Saturday chatter from support so I had a basic understanding. I took the shower apart to get to what I had hoped would be seats and springs only to find a cartridge. Again, not a problem I just need to replace the cartridge. Now we have a problem I can’t get it to come out. We had bought the cartridge removal tool which works wonders not only on removing the old one but also on lining up and installing the new one. We learned this lesson after ripping the plastic trying to get the first cartridge in without accidently putting it in slightly askew. Bill was now involved. I needed some brute strength and also someone to go up the ladder into the ceiling because I hate ladders, more passionately than he hates plumbing. We got the second cartridge installed and the shower no longer leaks! Huzzah! Problem solved, until the next morning. I was doing my morning plant check and it has become my habit to get to the studio by walking through the bedroom/bathroom. When I got to the bedroom closet I ran into what I swear was ankle deep water. My brain refused to understand what my feet were telling it. At first I thought we had broken the pipe in the wall taking the cartridge out and putting the new one in. That’s when it hit me, the drop of water striking the top of my head that is. The valve in the ceiling was leaking. For over a day water had been dripping from the ceiling, unto ceiling tiles, into felt storage bins full of hats and gloves, then a shelf, and unto the laminate floor where it had formed a large pool.
We now had two problems. One was that the ceiling tiles were soaked and the other was that I could not get under the laminate to dry up the water. We did our best to clean it up but the flooring was ruined. At this point I was not ready for the rodeo of tearing up flooring and replacing it, Bill was. Weirdly the flooring part of the story did not start with me saying, “So I was thinking …” it started with him saying it needs to go. I agreed and was kind of happy because the flooring had been down for almost a decade and had issues. That project is still in the works because when we tore it up we discovered “things”, plus the room is jammed with furniture so we have to do it in stages. Also I decided to repaint the walls for the second time in like 3 weeks.
I knew that ceiling tiles needed to be replaced. Some had been water soaked. Some were stained. Some had been broken. I started looking for ceiling ideas which was when I ran across these:
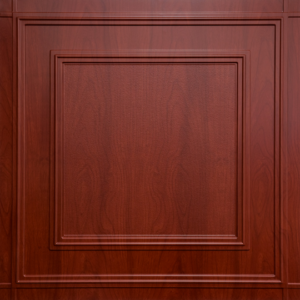
Manchester Cherry Wood Ceilume tile
I am in love. This company Ceilume is the ONLY company that makes these. You can find their product line here. Before buying in any kind of quantity I wanted to just see a sample to decide if I really did want to go that dark in the basement, in a smallish, lower ceiling room. The only way I could get a sample was to call the company direct. The company is located here in the USA and they manufacture these tiles here in the USA, two things I like a lot. The rep was nice, he not only sent a full sized sample of the tile I love but told me to pick two more. He said that IF I didn’t like the cherry tile and called back to try a different sample they would have to charge me over $30 in shipping. If I picked my top three tiles now he could send them all at once for free. I added the bronze and the copper and he sent me three full sized samples.
The cherry is my love and I was set to place my order from Home Depot. This is when I discovered that reading and math skills are important. I put the order in my cart and was ready to check out when I saw the total. Now it’s not that it is horrible it’s just that I had expected it to be a fourth of that price because reading is hard. In despair, my hopes and dreams crushed, I hung my head and did the walk of shame into Bill’s office to tell him of how I had failed to complete the bedroom remodel quest. After sulking for a few days facing the bitter reality that I could either buy the same kind of tile and just replace the ones that had been damaged, OR find a tree that grows money out in the woods. I came up with a secret plan. I already had a rust colored spray paint and Home Depot sells the white Ceilume tiles and they have them in stock. What if, now stay with me here, what if I did a faux cherry finish on the white tiles which would keep me in budget? I thought you could buy just a single tile from Home Depot but you can’t. They sell them in 10 packs in the store. You can buy them on line and if you bought a 40 pack they were .99 (they raised the price by more than .30 just in the last week or so, now they are $1.37 with the military discount). I bought the 10 pack to test. I did a tile similar in style to these for part of the ceiling in the main area and I still really like that better than the normal drop in tiles.
I took two tiles outside and sprayed them with the flat, rusty metal, Rust-oleum spray paint that I had used on the shop garage door side wall. I also had a can of gel cherry stain and I do like the gel for projects like this although you can do it with the normal thinner stains if you lay the tiles flat so your working on a horizontal surface. I have faux wood grain tools like the little paddle that you can rock to create grain and a brush with long plastic bristles that you can use to add texture and knock down hard lines. You can also get a whisk broom from a Dollar store and use that in place of this special brush. I just bought a Martha Stewart kit a long time ago on clearance so I’m using what I have. The flat rust color worked great as a base color, my hopes were rising. I brought the tile down to the basement and put it on the easel I had setup in the bedroom, and put the sample tile on the dresser against the wall and began graining. I started by using a cheap 2″ chip brush to put on a base of stain. I mimicked the grain direction that I was seeing on the sample and basically this was just keep the strokes going edge to edge in one direction. There was no having to worry about how the panels were put together and matching grain direction to construction with these. To start I just worried about getting full coverage of stain on the entire surface and then went back and ran the chip brush from top to bottom over the entire surface. With later tiles I have played a little bit with leaving more of the base coat showing to enhance the light and dark contrast but my favorite is to just cover the whole thing and build more grain from that. Because that chip brush doesn’t have a nice flat edge to the bristles, instead they have lots of short and long uneven ends it creates what looks like a subtle grain in your base. This is the part where it’s up to you and what you like. On the first tile I ran the graining paddle over my base coat rocking it to create the type of grain I was seeing in the sample. Then coming back with the fine tooth end of the grain paddle to add in smaller grain straight lines. I didn’t love it. So I used the chip brush and with just the end of the bristles I applied grain to create the pattern I was seeing on the sample. This seemed way to cartoonish and harsh so I alternated between the fine tooth and wide tooth of the graining paddle to add texture. Did not love that either. I used the chip brush to add in more stain/grain pattern and then used the brush to soften that, a little more paddle work, more stain, more paddle, then the long stiff bristled grain tool and finally had something I called done. I didn’t love it but I went ahead and did another tile trying to use some of what I had learned I like and not any of what I had learned I hated. I think it took me about 15 minutes of agony to create a tile I could live with. I put them aside to dry and waited.
I did not go back down for 3 days. When I could not put it off anymore I went down to see how bad they were. To my surprise they were actually really good. I brought one with the sample up for Bill to look at and he agreed. Now they are not as shiny as the sample but if that really bothers me I can put poly on them to bump that shine up. It does not bother me at all. I finished off the box of tiles and we just ordered the box of 40 so I can finish the room. The system that I like the best and is fairly easy and quick is:
1. Do the spray paint base coat, set it aside to dry.
2. Apply the stain to the tile making sure to cover the entire surface.
3. Run the cheap chip brush with uneven ends from top to bottom or bottom to top keeping it as straight as possible.
4. Using the chip brush I dip the ends barely into the gel stain and dab them on the tile to mimic the pattern I see on the sample tile.
5. Using the fine tooth end of the grain paddle I run it from top to bottom over the entire top.
6. Use the stiffer long bristled tool to run over the entire top from top to bottom to help soften the grain and blend.
7. Place the tile flat till dry, I typically wait about 3 days before putting them in the ceiling.
You get a feel for how hard or how soft you want to press with the paddle tool or the hard bristle brush. You don’t want to remove all the graining or make it look muddy but it’s cherry so the gain isn’t as bold as some woods it’s very subtle. Mostly it’s going to be in the ceiling so all the imperfections you think you see you will probably never notice once they are up. It’s more about the feel. That warmth and soft glow that wood has is what you are looking for. Up in the ceiling it give the room the feel of an old library or ship’s captain’s quarters. You could imagine a huge fireplace with leather chairs and thick Persian rugs with a wall of books and the smell of wood polish and cigar smoke mixing with the wood smoke from the fire. We went with a cherry vinyl plank flooring and I did a faux brick around the built in shelves. My concerns about the room being to dark were unfounded. But I do like dark so if you like light and white and bright this room would make you itch. After seeing it coming together I decided I needed to change the paint color. I had gone with a Smokey grey because I had a left over gallon but in the end I went with a darker green that has a slight yellow cast to it. It’s warm and inviting and I’m so happy we decided to change that ceiling out. Do I wish I would have just purchased the ceiling tiles already done, yes and no. It would be much quicker and easier but doing it this way helped to offset the cost of the flooring and that second gallon of paint, lol.
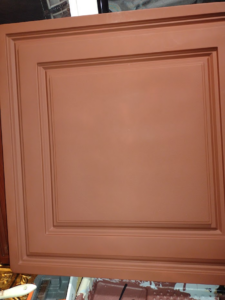 White tile primed with Rustoleum rusty metal spray paint |
 My faux cherry wood tile after applying stain and graining |
Manchester Cherry Wood Ceilume tile |
You can see from the photos, and I’m sorry that the first two are slightly crooked the third is from the manufacturers website, that it’s not perfect. This pic was before the stain had dried so it was still a little bit more wet/shiny looking. It does dry duller. The tones are slightly different and the graining is not an exact match for theirs, overall they look great. Now that they have started going up it is gorgeous. I’m going to update the post once I have an area finished. Hopefully there will be a before and after photo so you can really get a feel for how much this changed the feel of that space.
I’ve done many ceilings at this point and I’ve used at least five different kinds of products. I have to say hands down these tiles have been the easiest to install. I’ve even used material like this in the bathroom down there but they were the 2×4 tiles and they were screwed up not drop down. I like these so much better. You can cut them with scissors. They bend easy and pop back into shape easily. I had one small piece in a corner that didn’t want to stay down so I took the old ceiling tile that we are replacing and laid it on top of the Ceilume one and it lays flat now. With the larger pieces I don’t have to do that at all and we did not want to do that. For one we want to be able to get into the ceiling if we need to run any cable and the old tiles would break if you fiddled with them to much. These don’t. Plus they don’t rain down ceiling tile gunk on your head if you lift them up. Because there isn’t much space between what is above the tile and the tile these make it easier to install and lift if because they are so thin. If there is another water issue they won’t become saturated and fall apart. I’ll just have to dry them out and put them back up. They don’t off gas at all so there isn’t any smell other than the stain, lol. I painted the ceiling grid to match the tile and it now disappears. We could not be happier with this company and their product even if it is taking longer and making a lot more work to do it this way.
Don’t be afraid to just try something. When it’s paint or in this case paint and stain if you don’t like it, just redo it. Paint forgives and forgets.